Thursday, October 15, 2020

Chell's Italian Pasts Salad

This is literally the easiest and most delicious pasta salad you will ever make! I'm constantly asked to bring this to BBQ's and pot lucks. You can make it ahead of time and is even better made the night before. 

If you have seen my other recipes, I change recipes up quite often, with this recipe you can add any vegetables you like. I sometimes add green pepper instead of olives or add a half red onion. Suit your taste. This is one of my favorite summer recipes! This time I didn't use black olives. Most always it is included but I didn't have any on hand but it was just as tasty!


I forgot to take a picture of the ingredients so I'll jump straight to the recipe. 

Chell's Italian Pasta Salad

1 box of Rotini pasta 

1 8oz. BelGioiso Fresh Mozzarella Pearls. Hint: You can also use a block of cubed Mozzarella. 

1 cucumber skinned and diced.

1 lb. Genoa cubed Salami. - I never...NEVER change my salami choice! 

1 cup shredded carrot

1 can of medium black olives

Zesty Italian dressing

Cook pasta al dente, strain, and run under cold water to cool. In a large bowl, mix the vegetables and cheese, add the pasta, then coat with Zesty Italian dressing. You only need enough dressing to coat everything. Let it sit in the refrigerator for a couple hours. Enjoy!

All American Eggrolls

My mom used to make these, and then I started making this style of eggrolls when I had roommates. It was fun to make, made a ton, and fed the masses of friends we used to have over. I continue to makes these now. You can change the up the ingredients to your liking. I've added Mushrooms, chicken, corn, whatever you are craving. 

First, I start by browning the beef and onion. You can use any meat really, try a rotisserie chicken, debone and shred it and set it aside. Drain off any fat and then add onion and cook till just about tender. I like my veggies to still have a little bit so I undercook by a couple minutes.

Then I add the carrot and green pepper and continue cooking for a few more minutes. Put off to the side. You really could use any cheese you like. I prefer Colby & Monterey cheese. Get a bag already shredded or use a block.

I start making my egg rolls by separating them. Take your egg and mix it with a little water for your sealer. 

Then load them up with a spoon full of the meat, veggie mix. Add some cheese. and brush some of the egg wash along all sides. 


I fold them by turning in two corners, then roll them up.

In a skillet add vegetable oil. Enough to allow your egg rolls to cook evenly on each side. Let it heat over medium heat then add a few eggrolls at a time. 


Brown on each side and then rest on a baking rack. The egg rolls freeze up very nicely. Although I admit, they never last that long in my house. You can serve immediately. To heat them up, you can place them in the microwave for about 40 seconds and then enjoy!


All American Egg Rolls

1.5 - 2lb. Hamburger 
1 package eggroll wrappers
1 small onion
1/2 Cup shredded Carrot
1/2 Cup green pepper
1 Cup shredded cheese
1 egg
salt and pepper
Enough oil to cover the bottom of the pan and up the sides about 1/4 inch. 

Brown hamburger over medium heat, drain the fat and add onion and continue to cook till onion is translucent.

Add the carrot, pepper, and salt and pepper and continue cooking for a couple more minutes. if you like your veggies cooked through continue to cook to your likeness. Set aside to cool some.

Shred the cheese; you can also use a package of already shredded, pull all ingredients together in an assembly line. Mix your egg and a dash of water in a small dish for sealing the edges. Separate the eggroll wrappers on a damp paper towel. 

Place a spoon full of hamburger and veggies in the center of the wrapper, top with a spoon full of shredded cheese.

Wrap by folding two corners in over the hamburger mix, then roll the eggroll. 

In a skillet heat vegetable oil over medium heat. Place your eggrolls in the pan and cook for about 2 minutes on each side. They should be golden brown on each side.


Friday, May 19, 2017

My Sweet Potato Pie


At every Holiday or special occasion you can expect to see some Sweet Potato pie, Apple pie, Pecan pie, Pumpkin pie. I buy yams by the bushel in the summer and they last me almost a full year. A bushel is about 50 lbs. I keep them stored in a clothes hamper in my mud room. This is just 1 of many recipes I make with them.

This recipe is relatively quick and easy.

3 Large Yams
1 Stick of melted butter
1 C white sugar
1 C brown sugar
1 t vanilla
1/2 C condensed sweetened milk
1 t cinnamon
2 t lemon juice
2 eggs
1 pie crust
Cinnamon Sugar
Egg wash

Boil the yams till soft (1 hr.) and let them cool.

Preheat oven to 350. Peel yams and mash. Add vanilla, butter, sugars, cinnamon and lemon juice.
Mix with a hand mixer beat till smooth then slowly add 2 eggs and condensed milk.

Egg wash the uncooked pie crust and sprinkle with cinnamon sugar. Pour filling in the pan and Bake 1 hour or until center is set and crust is golden brown.

Sunday, February 5, 2017

Crockpot Rancho-Taco Chichen

Delish....


Y'all heard me say this before; this is one of my go recipes! No lie...I cook this just about every other week. I kick off my Sunday routine starting this in the crock pot. I usually start this right after breakfast and cook it slow. My sister introduced me to this recipe. I can't remember the original recipe name but I believe she came across it on Pin.  So I dubbed it the Crock Rancho-Taco chicken.

We eat it through the week; I make tacos with it. This recipe can be done in so many different ways. I've used the tortilla boats (find these at wally-world) and top it with black beans, tomatoes and cheese. Then bake them till cheese is golden. I do this with left overs because it's perfect for lunch.

Crock Rancho-Taco Chicken

  • 1.5-2 lb. Chicken thighs (Chicken breasts are good too!)
  • 1 pkg Fiesta Ranch season mix - fyi..most times I use regular Ranch season.
  • 1 pkg taco season mix
  • 1/2 C chicken broth

Place chicken in crock pot; single layer.

Sprinkle Ranch and Taco seasoning over chicken.

Pour chicken broth over. Cover and cook in crock pot on low for 6 hours of high for 3-4 hours. Pull apart and cook on low for a little bit longer; 1/2 hour. I like to pull it and let it cook low and slow while I start the rest of the dinner.

Here is a variation of this recipe I used the next day;

  • Rancho-Taco Chicken
  • 2 pkg Crescent Rolls
  • Colby Jack cheese
  • 1 egg

Heat oven to 350. Separate crescent rolls and place a spoon full of the chicken in the center of the dough.

Sprinkle with cheese. Place another crescent roll on top and seal with a fork.

Brush with egg and sprinkle with more cheese. Cook for 12-15 minutes, till golden brown. Its a wonderful thing!

Wednesday, February 1, 2017

Simple Man's Venison Dinner


Another favorite in our kitchen is a simple dish. It can be the go to meal during the week. We also do this when we camp. I have so many variations of recipes for Venison that I am trying to get together for this blog. I hope you enjoy them.

This recipe can be changed in so many ways to suit your taste. Sometime I use a soy sauce, honey marinade or a spice run marinade like, garlic powder, onion powder, seasoned meat tenderizer and salt & pepper with a little olive oil to coat. But by far the below marinade is our favorite. Again so versatile and good on really any meat. This is my main venison marinade or choice.

Simple Stir-Fry Venison Meal
  • 1 C Zesty Italian Dressing 
  • 1 T garlic powder
  • 1 T onion powder
  • 2 T Worcestershire Sauce
  • 1 T Red Pepper flakes (add more for a meal with a kick)
  • 1 LB Venison Stew cut meat
  • 1-2 green peppers 
  • 1 yellow onion
Mix all ingredients Italian dressing, garlic, onion, Worcestershire and red pepper flakes together in a small bowl. 

Pour over venison in a zip lock bag and marinade for a couple of hours or over night. 

Slice your onion and green peppers. Over medium-high heat, saute the green peppers and onion until slightly tender. Add the venison and continue to cook until med rare. About 10 min. This is great over rice or egg noodles. Enjoy! 

Monday, January 16, 2017

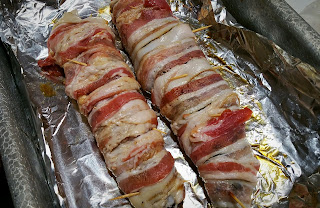
Sweet-Bacon Wrapped Venison Tenderlion


My husband is great hunter. We harvest a few deer each year to refill our meat stock. We trade meat with neighbors to keep a variety in our stock. I love Venison; it is so versatile and is the red meat of choice in our home. I hear folks say all the time, they don't like venison because of the gameness. It's all about how the meat is prepared. Sure you can soak the meat in water or milk but if you prepare the meat properly, you won't have to go through the soaking process.

My husband has his own method of preparing the deer meat before packaging. As with any other avid hunter, each have their own "best" practice that they have learned from their fathers or grandfathers. For mine; he will clean the meat and put it on salt ice for about 10 days before he cuts and packages the meat.  We use a 7 day cooler to pack the meat in ice and salt. The salt pulls the blood out of the meat and in my opinion removes the "gamey" taste.  We check the meat every day and drain and add ice as needed. Then clean all the silver skin away from the meat and cut to our family protons and freeze.

Our Christmas Eve catch yielded Tenderloin, Steaks, Stew meat and Flanks. We use all of the meat, including the heart. Yes, we keep the heart and eat it. We cook the heart on thanksgiving with some onions and green peppers. On Christmas we use the sweet meat (tenderloin) for breakfast biscuits.

Back to the recipe....this recipe is a wonderful on Port as well. I've done it with a large pork tenderloin without the bacon or with. It's a very simple recipe and I bet most folks; like me have all the ingredients in the pantry at any time.

Sweet Bacon wrapped Venison Tenderloin

  • 1 1/2 LB of Venison Tenderloin
  • 1/2 LB sliced bacon 
  • 1 Cup Soy Sauce (not the low sodium)
  • 1/2 C Brown Sugar (use as much brown sugar as you like)
  • 1 t Cumin
  • 1 t Garlic powder
  • 1 t black pepper (want a little kick; use red pepper flakes)
In a bowl, mix the Soy sauce, sugar and spices with a whisk till sugar is mostly dissolved. Pour over tenderloins and marinade for 3 hours or over night.

Remove tenderloins from marinade; don't discard the marinade! Wrap the them with bacon. Secure with toothpicks.

Heat your grill to med-high heat. Then baste with the marinade through out the cooking process. We like our meat on the med rare side so cook for 25 minutes, flipping as needed to evenly cook the bacon. Basting the with marinade will allow the bacon to crisp up and have a nice sweet flavor. YUM!

Note: Cook for approximately 35 min for medium/well done meat.

With our meal, i harvested the last of my carrots from the garden.

Clean up the carrots and trim the "hairs" as I call them. Slice them and put them in a sauce pan.

Simmer with water, 1 T of butter and 1 T of brown sugar until they are tender. Very simple yet very tasty. Enjoy!

Wednesday, December 7, 2016

Rice Krispies with a Twist!!


Who doesn't love Rice Krispy treats! During the Holidays my house sings snap, crackle and pop constantly.

I make these gooey little treats through out the year for birthdays, Easter, Christmas, and any time I need a marshmallow fix. I like any kind but my favorite are the treats made with a added ingredients. The most popular in my house is this recipe. My secret ingredient is;

Yep, Luck Charms marshmallows! The added marshmallow makes this treat so good! The marshmallows don't melt and are perfect for a little extra sweetness! You may be asking, do you really pick the marshmallows out of the cereal??

Yes I do, These treats are the best when you use the Lucky Charms cereal marshmallows. I have used these marshmallows in the past. It's something about the size and quantity of the mallows you get from a box of Lucky Charms that make them the best!

Drizzle some chocolate or make pops out of them; they are so versatile. I hope you enjoy this recipe and will have some more goodies top post as we move closer to the Holidays.

Rice Krispy Treats with a Twist


  • 6 cups of Rice Krispies
  • 1 bag of regular marshmallows or 6 cups of mini marshmallows
  • 3 T of better
  • 1 t of vanilla extract
  • The Marshmallows from 1 box of Lucky Charms cereal (if you use the cereal mallows mentioned in the link above then use 2 C)
Melt butter in a sauce pan over low heat. Add the marshmallows and continue to melt over low heat. Line a 9x13 pan with wax paper and spray with oil; set aside. 


Once melted, pull from heat and add vanilla and rice krispies and mix well. 

Then add the Lucky Charms mallows and mix well. 

Move mixture to the greased 9x13 pan. spread and let cool completely. 

Once cooled you can pull the formed krispies out of the pan, paper and all. Lay on a flat surface and cut into pieces using a bread knife. I find this knife gives you the cleanest cut. Any other knife and the gooey krispies will end up sticking to the knife. Enjoy!